Gravity Platformer: patent
A big sandbox of tools and tests, with one initial goal: build a Mario Galaxy-like gravity platformer.
This page walks through the iterations it took to get there, from computing the gravity direction on a single primitive to a full level design toolset of Attractors, GravityOverrides, line editors and Zones.
The four secrets
Making gravity feel good in a game comes down to four things:
GetClosestPoint(): the closest point from any position to an object: sphere, cube, capsule, line, group of lines, concave or convex 3D mesh… Some shapes are easy, others much less so. That vector is the gravity direction.- Restrictions: the closest point is great, but sometimes you don't want gravity once you are outside the object's limits. You need to be able to apply restrictions, easily, right in the level design: that's what the GravityOverrides are for.
- Level design first: the extra step of making gravity objects ultra easy to work with. It absorbs the complexity, so that anyone can then build levels.
- Optimization: the whole system has to run with 10,000 objects without breaking a sweat, hence the Zones, which only compute the Attractors that matter.
:::tip Why not Newtonian gravity? Newton's law is great in real life, or for a simulator, but games need custom calculations. No game has planets the size of real planets, and no game has the jump height of a real human. That's called a simulation… or boredom. :::
Gravity follows the environment
The direction of the gravity is relative to the environment, and it has to be quick to set up for every part of a level. To keep a generic approach, gravity points towards the closest object of the level design.
The first step is computing closest points on a cylinder primitive. The gravity can face:
- the trunk of the cylinder,
- the edge of the top or bottom disc,
- the inside of the top or bottom disc.
Attractors
Gravity then has to combine forces from multiple targets, called Attractors. For design purposes, the closest Attractor always applies the same force X; the other, farther Attractors apply their own force divided by a distance ratio.
GravityOverride
Going further, only certain parts of an Attractor should apply gravity. A custom editor manipulates these options directly in the Scene view: the GravityOverrides. Here, gravity is disabled when the player is above a given part of the cylinder:
There are as many Attractors as possible, each with as many GravityOverrides as possible. GravityOverrides are kept separate from the non-override Attractors, to save performance when they are not needed.
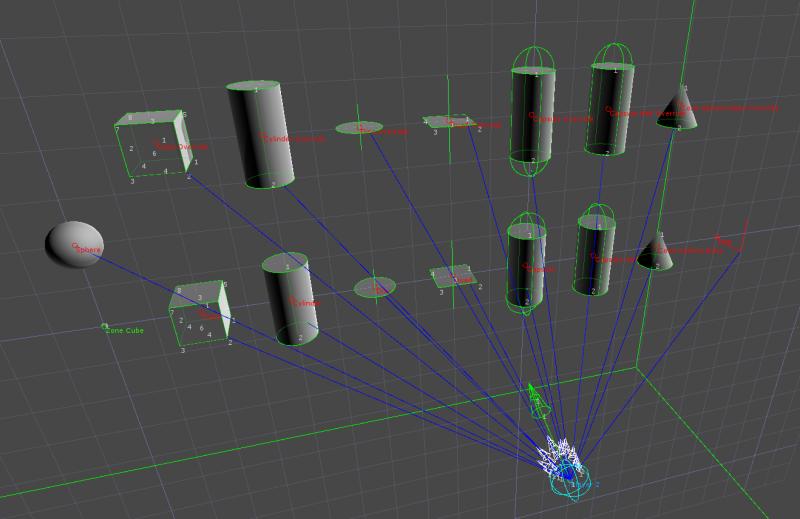
Attractors can be moved, rotated and scaled in the editor like any GameObject:
The current list of Attractors, each with its own closest-point maths:
- Sphere / half-sphere: the classic planet; the half-sphere can switch off its flat top.
- Cube: 6 faces, 12 edges and 8 corners, each one can be switched on or off.
- Capsule / half-capsule: a line with a radius; the trunk and each end can be switched off.
- Cylinder: the trunk and both discs (their face or only their border).
- Cone: a cone with a rounded base: tip, base and trunk.
- Disc: its face, or only its border.
- Donut: pulls toward the inner ring, like a torus world.
- Quad / plane: a quad (face, 4 edges, 4 corners) or an infinite plane.
- Triangle: front face, back face, 3 edges and 3 corners.
- Line: the trunk and both ends.
- Spline: any curve drawn with the line editor below.
- Convex mesh: any convex model, using the physics engine's closest point.
- Concave mesh: any model: a KD-tree search within a max radius, cached per object and smoothed so gravity never jitters.
Every shape has an Advanced version that adds those GravityOverride toggles, plus a min / max range outside of which it stops pulling. Shapes cache their transform and only recompute when they move.
Line editor
A line editor gives custom gravity to some levels. It is of course compatible with GravityOverrides, and works the same with multiple lines:
Zones
To optimize the calculations, the level design is organized into chunks, and only the Attractors inside the current chunk are computed. A Zone holds a list of Attractors; it can be set inclusive or exclusive of the others, and comes in several shapes:
Under the hood

Every physics frame, each object that feels gravity (a Graviton) goes through the same pipeline:
- Zones decide who counts. Attractors are listed in trigger zones: physics colliders, or pure shape tests when there is no physics. Entering a zone adds its Attractors to the Graviton; leaving removes them. A Graviton only ever computes the Attractors around it.
- Every Attractor is a shape. 16 shapes share the same two functions,
GetClosestPoint()andIsInsideShape(): sphere and half-sphere, cube, capsule and half-capsule, cylinder, cone, disc, donut, quad, plane, triangle, line, spline, convex mesh and concave mesh. Convex meshes use the physics engine; concave meshes use a KD-tree, a per-object cache and optional smoothing so the gravity never jitters. Shapes cache their transform and only update when they move. - GravityOverrides restrict it. Each shape has its own override: a cube can switch off any of its 6 faces, 12 edges and 8 corners; a cylinder its trunk and each disc's face or border; a triangle its face, edges and corners… plus a maximum range.
- Inside the volume? Gravity can keep pulling, stop, or flip. An optional rotation offset can also tilt the gravity direction.
- Filter. In an Attractor group, only the closest one counts (many shapes can form a single planet), and Attractors pulling in almost the same direction are merged.
- Combine, not Newton. The closest Attractor gives a fixed force (mass × factor × 9.81), whatever the distance; the others are scaled down by how much farther they are. Factors can differ per entity type (player, enemies…).
- Apply. The force goes to the Rigidbody, the object turns its "up" toward the opposite of gravity, and reverse-gravity zones can flip it (with an optional tilt).
It stays cheap: closest points are refreshed every 0.1 s with a random first offset, an option only recomputes the closest Attractor between full passes, and everything is visualised in the editor with arrows and colour-coded shapes.
In the patent drawings
The same method, drawn the way a patent needs it: black lines and numbered parts.


Three bodies: a fixed default, blended with the others

- Between three bodies, the closest one is the reference: its force is always the full default (mass × factor × 9.81), whatever the distance, so running and jumping feel the same everywhere. The others are scaled by the ratio of squared distances: at twice the distance a body pulls four times less, at three times the distance nine times less. The sum is mostly the closest body, bent toward the others.
- Exactly in the middle of two identical bodies, both forces are equal and cancel out: a weightless point between planets. One step closer to either one and it becomes the reference.
- Outside every zone, gravity never drops to zero: the last direction is kept, and an "out of gravity" timer starts: handy for long jumps between planets.
The camera

A Mario Galaxy-like game lives or dies by its camera: the ground can be anywhere, so the camera has to follow the gravity, not the world. It is built as a stack of layers, each one smoothing toward its own target every frame:
- Gravity pivot: on the player, its "up" is the opposite of gravity, smoothed (more slowly in the air than on the ground). When the gravity changes, a transition kicks in; during a jump the camera keeps the "up" of the jump until the player lands, so it doesn't spin mid-air.
- Rotate left / right around the player with the stick, with a dead zone and an ease curve, and when the player doesn't touch it, the camera turns back toward the goal or the player's forward on its own.
- Dolly on a spline: the stick's vertical axis moves a 0–1 percent along a spline behind the player: both the camera position and the point it looks at slide along it, so low means looking up and high means looking down.
- Zoom: the trigger scales the whole rig between a minimum and a maximum, plus an optional extra tilt.
- Final camera: position smoothed toward the rig, and a look-at whose "up" is itself interpolated, so gravity changes never snap the view.
Camera zones let level designers take over locally: see below.
Camera zones

The camera rig is generic; camera zones are how level designers direct it. A camera zone is a trigger built on any of the 16 shapes (or a plain collider), placed and scaled like any object. While the player is inside, it can override any part of the camera system, each setting is optional:
- the "up" reference: gravity, ground, inverted gravity, or a custom transform;
- where the camera looks: a fixed direction, or a target to track;
- the auto-rotation profile: wide or narrow, slow or fast, or continuously following the player's forward;
- a custom camera target position, with its own interpolation;
- the dolly height on the spline (look up / look down), the zoom, the FOV and the offset;
- the player's freedom: allow or forbid manual rotation, enable the up/down follow on jumps, reset the input lock.
On enter, the zone saves the current values and applies its own; on exit, it restores them (optional per zone), then re-activates any other zone the player is still inside, so overlapping zones hand over cleanly. When several zones point at targets at the same time, the camera aims at their average. Zones reference objects through GUIDs, so they work across scenes, and all their settings, target, direction, custom "up", are drawn in the Scene view.
Pathfinding over non-flat worlds
Walking on planets means the AI has to walk on them too. Agents find their way across the surfaces of spheres, capsules and cubes, following the gravity of each Attractor: the white dots show the path computed from each agent to its target.
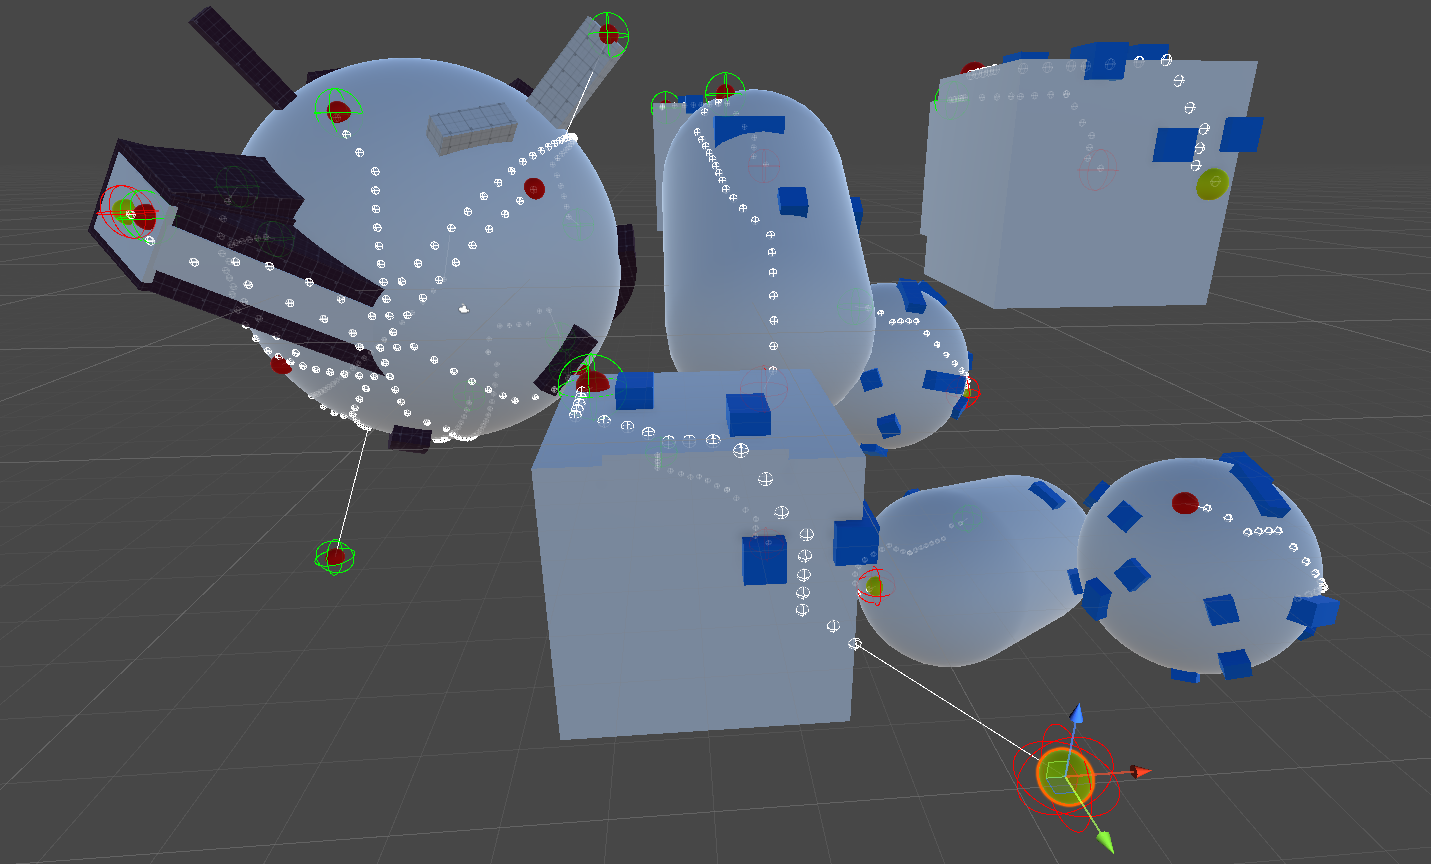
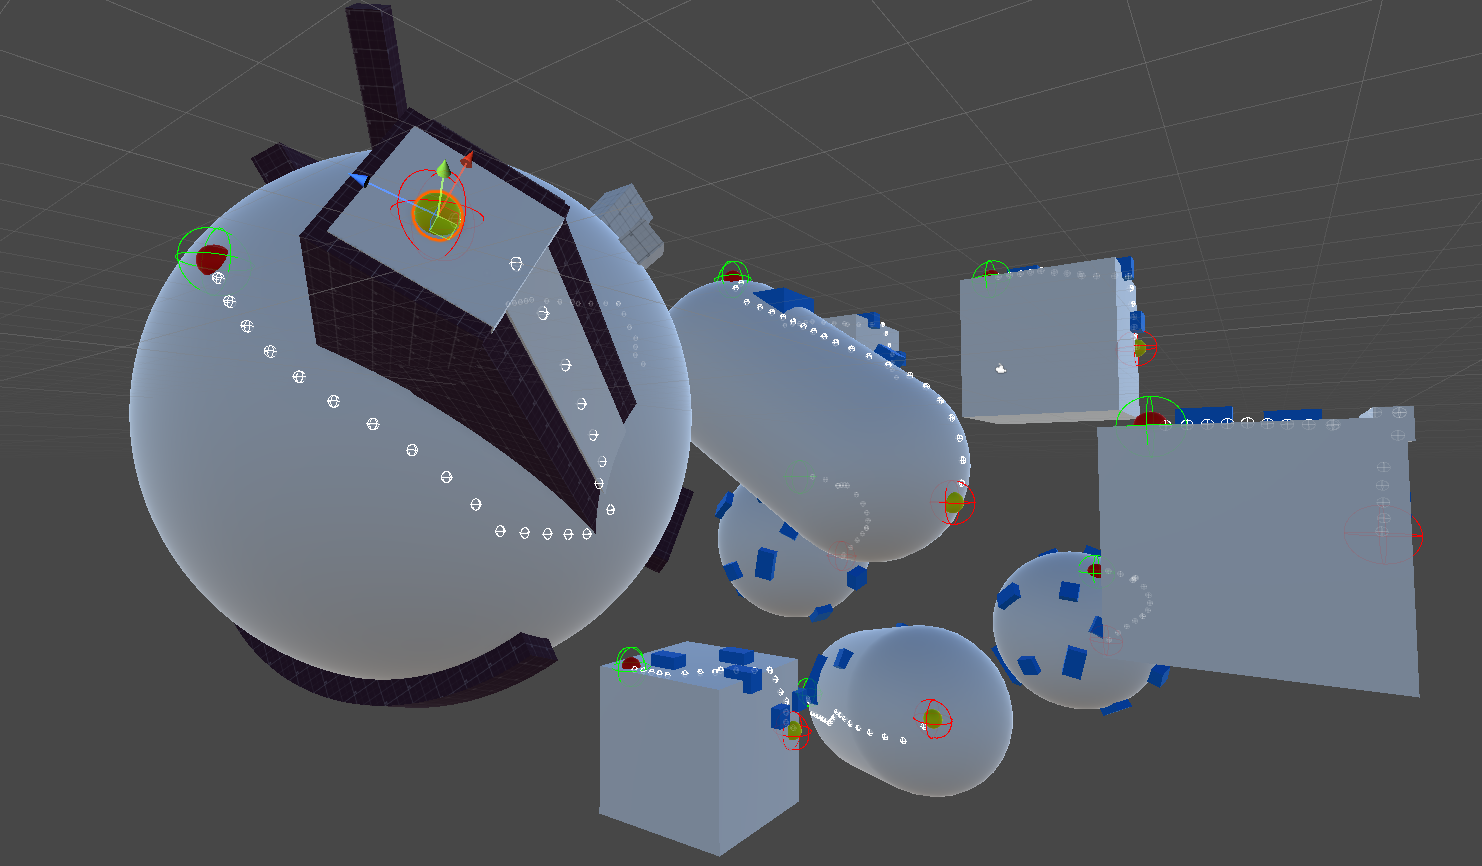
Two levels of graphs

Pathfinding works at two levels, using graph theory:
- The galaxy is a graph. Every planet is a node, and the links between planets are the edges. A first pathfinding pass over this graph picks which planets to go through to reach the destination.
- Every planet has its own navigation. On each planet, a custom nav mesh agent, built and optimized for non-flat worlds, handles spheres, cubes, convex and concave objects, and everything is generated at runtime.
How it is built

Each planet builds its own navigation grid at runtime, a few moments after the level loads:
- Cube-sphere sampling: a grid of N×N points on each of the 6 faces of a cube, mapped onto a sphere with an equal-area formula (N between 5 and 20, typically 14: about 1,200 nodes per planet).
- Cast inward: from each point, a sphere cast toward the planet's centre. The hit point becomes a node. The grid follows whatever surface is there: sphere, cube, capsule or custom mesh. Nodes on obstacles are marked not walkable.
- Neighbours & seams: each node links to its 8 walkable neighbours, and the borders of the 6 faces are stitched together, so paths wrap around the planet without seams.
How it runs

- Which planet? Every half-second, the closest planet to the AI and to its target, using each planet's real shape.
- Galaxy graph: planets are nodes and teleporters are edges; a breadth-first search finds the route with the fewest jumps, and the AI heads for its first teleporter.
- Planet grid: an A* search (binary heap) from the AI to that teleporter, or straight to the target when both are on the same planet.
- Steering: the AI aims at the closest point of its path, projected on the plane of its current gravity.
The path is kept alive cheaply: reached points are dropped and new ones added as things move, a full recompute only happens when the AI or its target moved far enough, and timers are randomly offset so many AIs never recompute on the same frame.